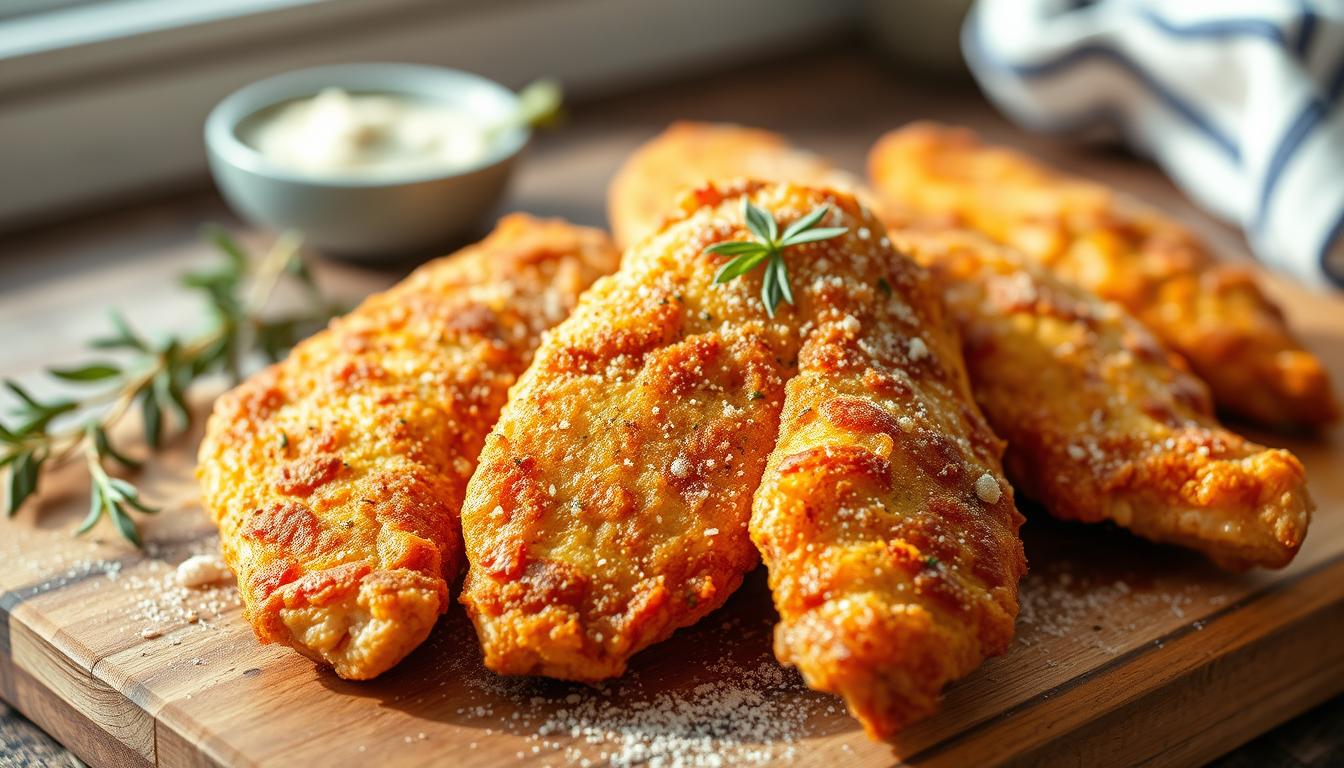
Top 5 breaded chicken tenders in oven to try
Table of Contents
Top 5 breaded chicken tenders in oven to try
Craving something crispy, juicy, and guilt-free? Baked chicken tenders are the perfect solution for a quick, delicious meal. Skip the grease of deep-frying and enjoy the same satisfying crunch—straight from your oven.
Whether you’re meal prepping or feeding picky eaters, these recipes offer a healthier twist without sacrificing flavor. From classic panko-crusted bites to bold, zesty variations, each dish comes together in just 30 minutes—ideal for busy weeknights.
With simple ingredients like pantry spices and breadcrumbs, you’ll achieve golden perfection every time. Plus, we’ve included pro tips to ensure maximum crispiness. Ready to upgrade your dinner routine? Let’s dive in!
Key Takeaways
- Healthier alternative to fried versions with the same crispy texture.
- Five unique recipes, including classic and creative flavors.
- Ready in 30 minutes—perfect for quick meals.
- Uses pantry spices and breadcrumbs for easy prep.
- Pro tips for achieving oven-baked crispiness.
Why You’ll Love These Baked Chicken Tenders
Looking for a healthier twist on a classic favorite? These baked chicken tenders deliver the same satisfying crunch as fried versions—without the extra oil. Perfect for busy weeknights or picky eaters, they’re a win-win for taste and nutrition.
The secret? A wire rack ensures even airflow, so every bite stays crispy—no soggy bottoms. Plus, they cook evenly without flipping, saving you time. With just 4g of fat per serving, you can indulge guilt-free.
Kid-approved and ready in 30 minutes, this dish is a lifesaver. Customize flavors with pantry staples like garlic powder or smoked paprika. Serve with honey mustard or BBQ sauce for extra fun.
Baked vs. Fried: Key Differences
| Baked | Fried | |
|---|---|---|
| Fat Content | 4g per serving | 12g+ per serving |
| Prep Time | 5 minutes | 10 minutes |
| Cleanup | Easy (foil-lined sheet) | Greasy mess |
For best results, lightly coat the wire rack with cooking spray to prevent sticking. Aluminum foil underneath catches any crumbs, making cleanup a breeze.
Essential Ingredients for Perfect Breaded Chicken Tenders
The secret to restaurant-quality crispy bites starts with the right ingredients. A few pantry staples and smart prep techniques ensure golden, flavorful results every time.
Chicken and Breading Basics
Opt for chicken tenderloins—they cook evenly and stay juicy. The triple-coating method locks in moisture: dip in flour, then egg, and finally seasoned bread crumbs. For extra crunch, swap regular crumbs for panko.
Must-Have Seasonings and Spices
Elevate flavor with a blend of garlic powder, onion powder, and paprika. Add Italian seasoning or a pinch of cayenne for heat. Gluten-free? Use GF flour and crumbs. For richness, mix in ¼ cup grated Parmesan.
Pro tip: Let coated pieces rest 5 minutes before baking. This helps the coating adhere better.
How to Make Crispy Breaded Chicken Tenders in the Oven
Skip the takeout—your oven does all the work. With a few simple steps, you’ll get golden, crunchy results every time. No deep fryer required!
Step 1: Prep Your Dredging Stations
Preheat oven to 425°F. Line a baking sheet with foil and place a wire rack on top. This setup ensures even heat circulation.
Set up three shallow bowls: one with flour, another with beaten eggs, and the last with seasoned bread crumbs. Add spices like garlic powder or paprika for extra flavor.
Step 2: Coat the Chicken Evenly
Dip each piece first in flour, then egg, and finally the crumbs. Press gently to help the coating stick. For maximum crunch, use panko or mix in grated Parmesan.
Pro tip: Let the coated pieces sit for 5 minutes before baking. This prevents the crumbs from falling off.
Step 3: Bake to Golden Perfection
Arrange the pieces on the wire rack. Lightly spray with cooking spray for deeper browning. Bake chicken for 10–15 minutes, flipping halfway, until the internal temperature hits 165°F.
For extra crispiness, broil for 1–2 minutes at the end. Serve hot with your favorite dip!
5 Flavor Variations to Try
Flavor-packed variations make this dish anything but boring. Swap basic seasonings for bold blends—each recipe keeps the same crispy texture but adds a unique twist.
Parmesan-Herb Crusted
Mix ¼ cup grated Parmesan with 1 tbsp Italian seasoning into your bread crumbs. The cheese adds a savory depth, while herbs brighten every bite.
Spicy Cajun Style
Kick up the heat with 1 tsp cayenne and smoked paprika. This spicy Cajun blend pairs perfectly with cool ranch or yogurt dip.
Panko-Crusted Extra Crunch
For maximum crispiness, use all panko. Toast the crumbs in a dry skillet first for a nutty flavor. The result? A golden, shatteringly crisp coating.
Lemon-Pepper Zing
Zest 1 lemon into the crumb mixture, then add cracked black pepper. The citrus cuts through richness for a refreshing finish.
BBQ Ranch Glazed
Brush cooked pieces with BBQ sauce and drizzle with ranch. Sweet, smoky, and tangy—this combo is a crowd-pleaser.
| Variation | Key Ingredient | Prep Tip |
|---|---|---|
| Parmesan-Herb | Parmesan + herbs | Press cheese firmly into crumbs |
| Spicy Cajun | Cayenne + paprika | Adjust heat to taste |
| Panko-Crusted | Toasted panko | Broil 1 minute for extra color |
Tips for the Crispiest Baked Chicken Tenders
Golden, crunchy perfection is just a few smart steps away. Whether you’re a beginner or a pro, these techniques ensure every bite stays irresistibly crisp—without frying.
Elevate with a Wire Rack
Skip soggy bottoms by placing your pieces on a wire rack over a baking sheet. This lets hot air circulate evenly, crisping all sides. No flipping needed—just set it and forget it.
For extra insurance, lightly spray the rack to prevent sticking. Foil underneath catches crumbs for quick cleanup.
Broil for a Final Crunch Boost
After baking, move the rack 6 inches under the broiler for 1–2 minutes. Watch closely—the high heat turns the coating golden fast. This mimics fried texture without the oil.
| Method | Benefit | Tip |
|---|---|---|
| Wire Rack | Even crispiness | Use with foil for easy cleanup |
| Broiling | Deep golden color | Monitor to avoid burning |
- Don’t overcrowd: Space pieces apart on the baking sheet for proper airflow.
- Double-coat: Dip in crumbs twice for extra thickness.
- Rest before serving: Wait 2 minutes to lock in juices.
Best Dipping Sauces to Pair
The right sauce can turn a good dish into a great one. Whether you prefer tangy, spicy, or creamy, these dips elevate every bite. Here’s how to match flavors like a pro.

Classic pairings never disappoint. Try honey mustard for sweetness, cool ranch for herby freshness, or smoky BBQ for depth. Each adds a familiar twist.
Love heat? Sriracha mayo or chipotle aioli bring fiery kicks. For a healthier twist, mix Greek yogurt with garlic or dill. It’s creamy without the guilt.
Sweet contrasts work wonders. Mango habanero glaze or apricot ginger dip balance savory flavors. Pro tip: Warm fruit-based sauces for extra richness.
Short on time? Whisk ketchup with Worcestershire sauce for instant umami depth. It’s a 2-minute hack with big flavor.
| Sauce Type | Best For |
|---|---|
| Spicy | Chipotle aioli, sriracha mayo |
| Healthy | Greek yogurt + herbs |
| Sweet | Mango habanero, apricot ginger |
Mix and match to find your perfect dipping sauce. The right combo makes every meal memorable.
Serving Suggestions for a Complete Meal
Transform your meal into a balanced feast with these perfect pairings. Whether you need a light lunch or a hearty dinner, the right side dishes enhance flavor and nutrition.
Healthy Side Dishes
Keep it light yet satisfying. Roasted Brussels sprouts or steamed broccoli add crunch and fiber. For a protein boost, try a quinoa salad with lemon dressing.
Air-fried asparagus or green beans cook in under 10 minutes. Toss them with garlic for extra zest. These options keep your plate healthy without skimping on taste.
Kid-Friendly Pairings
Picky eaters? Sweet potato fries or mac and cheese are instant hits. Serve with fruit skewers for a sweet contrast.
For fun presentations, try mini corn muffins or cucumber “coins.” They’re easy to prep and packed with protein.
- Light lunches: Top garden salads with tenders and balsamic glaze.
- Weeknight dinners: Add garlic bread and marinara for Italian flair.
- Meal prep: Portion with roasted veggies for grab-and-go ease.
How to Store and Reheat Leftovers
Keep your leftovers tasting fresh with these smart storage tricks. Whether you’re meal prepping or saving extras, the right methods lock in flavor and texture.

Refrigerator Storage Tips
Cool cooked pieces within 2 hours to prevent bacteria growth. Use an airtight container to keep moisture out—this preserves crispiness for 3–4 days.
For uncooked portions, freeze them on a tray first. Once solid, transfer to a freezer bag for up to 3 months. No thawing needed—bake straight from frozen.
Reheating for Maximum Crispiness
The air fryer is your best friend here. Set it to 350°F and reheat for 3–5 minutes. The hot air revives the coating’s crunch.
No air fryer? Use your oven’s wire rack at 350°F for 10–15 minutes. Avoid microwaving—it turns the coating soggy unless you’re in a rush.
- Quick tip: Spritz reheated pieces with oil for extra browning.
- Freezing hack: Label bags with dates to track storage time.
Common Mistakes to Avoid
Small missteps can turn golden perfection into a kitchen fail. Even with the best ingredients, these errors lead to soggy coatings or uneven cooking. Here’s how to sidestep them effortlessly.
Overcrowding the Baking Sheet
Packing too many pieces on the baking sheet traps steam. Instead of crisping, they’ll turn soft. For even browning, leave space between each piece—about ½ inch apart.
Skipping the Flour Dredge
The flour dredge isn’t just for tradition. It helps the egg wash cling to the meat, locking crumbs in place. Miss this step, and your coating may slide right off.
- Underseasoning: Taste your crumb mix before coating. Bland breading? Add more salt or spices.
- Stale crumbs: Fresh breadcrumbs stick better. Stale ones crumble during baking.
- Cutting too thick: Aim for ½-inch strips with tenderloins. Thick pieces cook unevenly.
“Flour acts like glue—skip it, and your coating won’t hold.”
Conclusion
Ready to upgrade your weeknight dinners with minimal effort? These baked chicken tenders prove that crispy, delicious meals don’t require frying. With just 30 minutes and basic ingredients, you’ll have a crowd-pleasing recipe on the table.
Don’t stop at classic flavors—experiment with spicy Cajun or zesty lemon-pepper twists. Pair them with your favorite dipping sauces for extra fun. Plus, you’ll enjoy a healthier meal, packing high chicken protein with less fat than fried versions.
Always use a meat thermometer to ensure safe cooking. Share your creations online with #CrispyBakedEats to inspire others. Your oven is all you need for golden perfection!
FAQ
What makes baked chicken tenders healthier than fried ones?
Can I use panko instead of regular bread crumbs?
How do I prevent the coating from falling off?
What’s the best temperature and time for baking?
Can I make these ahead for meal prep?
What dipping sauces pair well with these?
Are there gluten-free options?
For more cooking tips, stay connected with us. We also recommend the cookbook Skinnytaste Simple: Easy, Healthy Recipes with 7 Ingredients or Fewer
For more Recipes about Chicken