Air Fryer Chicken Wings Crispy Perfection
Table of Contents
Air Fryer Chicken Wings Crispy Perfection
Craving restaurant-quality wings at home? Your countertop appliance can deliver golden, crunchy results faster than traditional methods. Rapid air circulation locks in juiciness while creating an irresistible outer layer—no deep-frying required.
Home cooks love this method for its efficiency. Test kitchens confirm it beats oven baking, achieving better texture in half the time. Even frozen pieces turn out perfectly, making weeknight meals a breeze.
Health-conscious eaters appreciate the 80% oil reduction compared to deep frying. This technique preserves flavor while aligning with gluten-free and low-carb lifestyles. One user raved, “My family thought they came from a sports bar!”
Key Takeaways
- Superior crispiness through advanced air circulation technology
- Uses significantly less oil than deep frying
- Works with both fresh and frozen pieces
- Ready in 23 minutes—faster than oven baking
- Naturally accommodates gluten-free and keto diets
Ingredients for Crispy Air Fryer Chicken Wings
Transform ordinary ingredients into a crowd-pleasing appetizer with the right mix. Whether you prefer classic flavors or bold twists, starting with quality components ensures success.
Essential Ingredients
Keep these staples on hand for foolproof results:
- 1 lb split pieces (flats and drumettes)
- 1 tbsp olive oil or cooking spray for even coating
- ½ tsp each paprika and garlic powder for depth
- 1 tsp salt and baking powder (aluminum-free for crispiness)
Pro tip: Pat pieces dry with paper towels before seasoning. Moisture is the enemy of crunch.
Optional Seasonings and Sauces
Customize with these flavor boosters:
- Smoky: Chipotle or smoked paprika
- Sweet-heat: Honey garlic or sugar-free BBQ glaze
- Classic: Toss in buffalo sauce with ranch or blue cheese dip
For gluten-free or keto diets, opt for cornstarch-free blends. Frozen pieces work just as well as fresh—thaw before cooking.
Preparing Your Chicken Wings
Mastering the prep work makes all the difference in texture and taste. Two steps—drying and marinating—ensure golden, crunchy perfection every time.

Drying the Wings Properly
Pat chicken pieces thoroughly with a dry paper towel. Moisture prevents crispiness, so press firmly to absorb all liquid. For extra crunch, try this double-dry method:
| Method | Steps | Time |
|---|---|---|
| Quick Dry | Pat with paper towel, season immediately | 5 minutes |
| Advanced Dry | Salt rub → refrigerate uncovered | 1+ hours |
“I refrigerate mine overnight—the skin gets impossibly crisp!”
Marinating for Maximum Flavor
Marinating time matters. Aim for at least 30 minutes, though overnight boosts depth. Use olive oil as a base for spice blends. Pro tip: *Rub seasonings under the skin* for intense flavor.
- Wet marinades: 2 tbsp oil + acid (lemon/vinegar) + herbs
- Dry brines: Salt + baking powder (1 tsp per pound)
Always refrigerate while marinating. For food safety, never reuse leftover marinade.
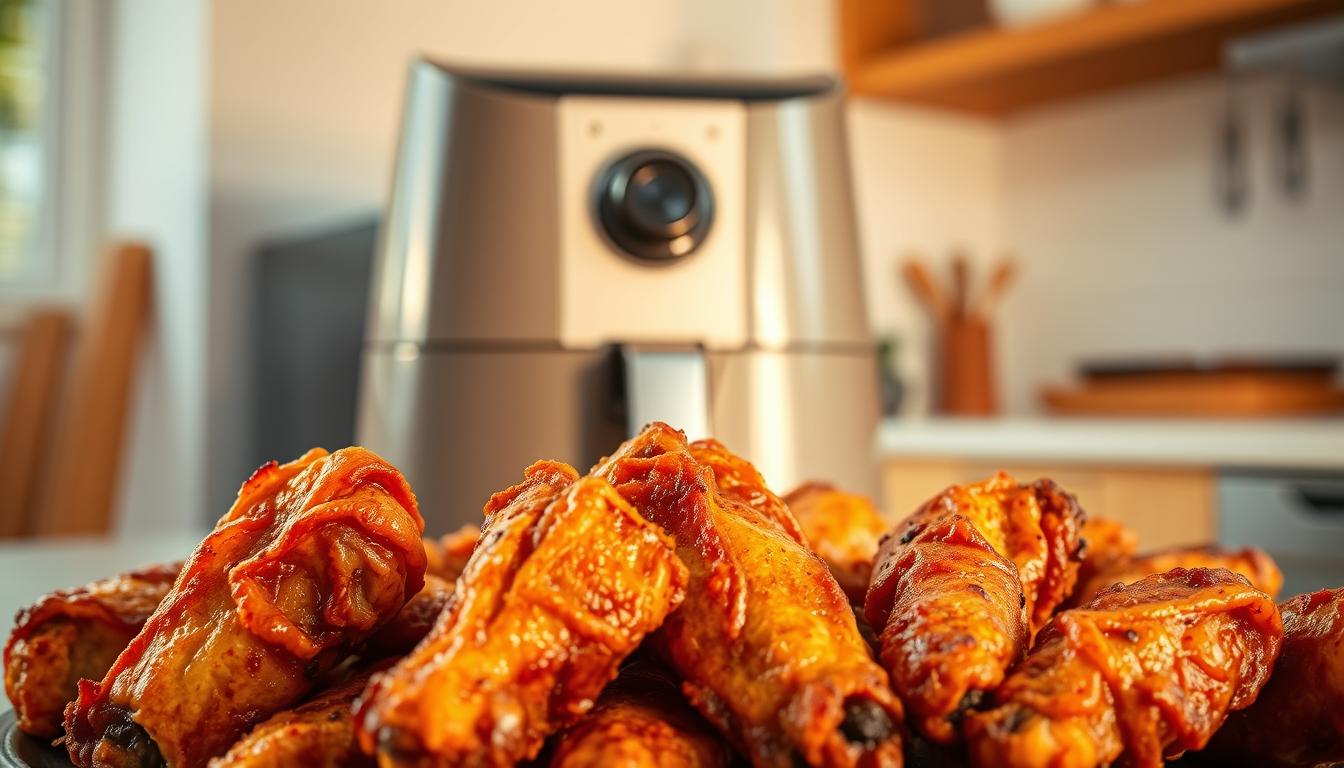
Cooking Air Fryer Chicken Wings to Crispy Perfection
Achieving restaurant-level crunch at home requires precision timing and heat control. Follow these steps to lock in juiciness while creating a golden exterior.

Preheating the Air Fryer
Always preheat to 380–400°F for optimal results. This ensures even cooking from the first minute. Skip this step, and you risk uneven texture.
Arranging for Even Cooking
Place wings in a single layer in the air fryer basket. Overcrowding traps steam, making pieces soggy. For extra crispiness, use the vertical placement hack:
| Method | Benefit |
|---|---|
| Flat Lay | Standard even browning |
| Vertical Stand | Enhanced airflow for crunch |
“I stand mine like dominoes—crispy on all sides!”
Adjusting Temperature for Crispiness
Two-stage cooking works best:
- Start low (300°F): Renders fat slowly.
- Finish high (400–450°F): Crisps the skin.
Flip halfway through, about 12 minutes in. Check internal temps with a meat thermometer—165°F means they’re done. Frozen pieces need 3–5 extra minutes.
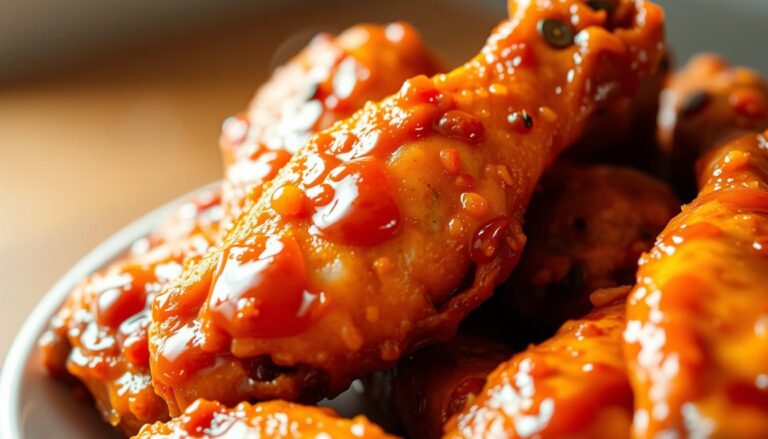
Seasoning and Serving Your Wings
The final touches turn golden pieces into flavor-packed masterpieces. Whether you prefer classic Buffalo or innovative glazes, proper technique ensures every bite delivers maximum taste without sacrificing texture.
Sauce Application Methods
Toss cooked pieces in a bowl with your preferred sauce for even coverage. This works best for thinner sauces like Buffalo or garlic parmesan. For thicker glazes, use a brush to preserve crispiness.
Timing matters. Always sauce immediately after cooking while pieces are hot. “I wait 30 seconds after removing from heat—just enough to set the crust,” advises chef Marco White.
Popular combinations include:
- Sweet-heat: Honey sriracha with lime zest
- Smoky: Chipotle-maple with crushed peanuts
- Classic: Buffalo sauce with blue cheese crumbles
Complementary Pairings
Balance rich flavors with fresh side options. Crisp celery sticks and carrot coins cut through richness. For heartier meals, add sweet potato fries or jalapeño cornbread.
Dipping sauces should contrast your main flavor profile:
| Wing Style | Ideal Dip |
|---|---|
| Spicy | Cool ranch or yogurt dill |
| Sweet | Tangy blue cheese |
| Savory | Garlic aioli |
Garnish with sesame seeds or chopped herbs for visual appeal. Dietary alternatives like vegan ranch or sugar-free BBQ ensure everyone enjoys the feast.
Conclusion
Ready to upgrade your game-day snacks with minimal effort? This method delivers golden results in 23 minutes, using 80% less oil than deep frying. Testers rave about the texture—one called it “better than restaurant wings.”
Experiment with spice blends or glazes to match your taste. Leftovers keep for 4 days in the fridge or freeze for a month. Reheat in your air fryer at 350°F for 4 minutes to restore crunch.
“I’ll never order takeout again,” says home cook Jamie. Share your creations online and tag #PerfectBites. For consistent results, try the Instant Vortex Plus—each serving packs 23g protein.
FAQ
Do I need to preheat the appliance before cooking?
How do I prevent sticking without overcrowding?
What’s the best way to dry the meat before seasoning?
Can I use frozen ingredients, or should they be thawed?
What temperature delivers the perfect texture?
How do I add sauce without losing crispiness?
What are the best seasoning blends for flavor?
Why are my results unevenly cooked?
For more cooking tips, stay connected with us. We also recommend the cookbook Skinnytaste Simple: Easy, Healthy Recipes with 7 Ingredients or Fewer
For more Recipes about Chicken